Get a Grip When You Hit the Road
Developing Grip Strength with Bodyweight Exercises
Brad Johnson
October 21, 2004 01:13 PM
No, this is not an article on how to control road rage although it might be a good idea to pull off the road and do a couple of them if you feel intensely angry. Better yet, just throw a pair of grippers in your glove compartment and give it a few squeezes when you feel stressed on the road. It would be better to utilize the excess energy for something productive rather than something that is destructive to yourself and/or others.
I first became interested in grip strength training when my grandfather told me that he did pinch grip chins hanging from the rafters in the barn. As an adult, I decided that I wanted to pursue the elusive feat of rafter pull-ups and purchased
Mastery of Hand Strength by John Brookfield (get yours from
www.IronMind.com) in the hopes that it would assist me in reaching this goal. Not only did it do that, but Brookfield's book inspired me tremendously in coming up with other bodyweight exercises utilizing easily accessible and cheap materials.
One of the reasons that I like performing the exercises that will be covered in this article is that they develop upper body, wrist and/or abdominal strength in addition to grip strength. Specifically, the grip will be worked while performing push-ups, jackknives and pull-ups. Additionally, all of the equipment that you will need for these exercises will fit in a bag that can be thrown into the trunk of your car and done in a park or rest area on a road trip when access to a gym is impossible and lugging around hundreds of pounds of weight equipment is inconvenient. You may decide that you like the exercises enough to regularly include them in your workouts. I have included an exercise for the following types of grip strength:
support grip (Knife Fighter Push-Ups),
pinch grip (Pinch Grip Push-Ups),
wrist (Lever Jackknives) and
crush grip (Pliers Pull-Ups).
One of the frequently stated disadvantages of bodyweight exercises is that your bodyweight is fixed. A single push-up may be beyond your current ability. What good is an exercise if you cannot perform a single rep? On the other hand, push-ups may be so easy for you that you can perform 20 or more reps before your muscles feel challenged in the least. Unfortunately, when you have performed that many reps, you have ventured off into strength endurance land. High reps of push-ups will not do the trick when your goal is developing maximum strength. To have an effective strength training session, you must be able to adjust the resistance to make the exercises possible but difficult enough that three to five repetitions are challenging. It is also important to be able to increase the resistance as you gain strength. In
The Naked Warrior Pavel teaches us that it is possible to adjust the resistance of bodyweight exercises by "redistributing the weight between your limbs, manipulating the range of motion, training in an unstable environment, varying the leverage, and minimizing bounce and momentum".
I will teach you to vary the resistance of push-ups by elevating your hands (to decrease the percentage of your bodyweight that you are pushing) or elevating your feet (to increase the percentage of your bodyweight that you are pushing). I did an experiment to get an estimate of what percentages of bodyweight that I push by manipulating the position of my hands or feet. I measured the amount of my bodyweight that I pushed by getting into push-up position with my hands on top of a bathroom scale in the following push-up positions: hands on picnic table with feet on ground, hands on bench of picnic table with feet on ground, hands and feet on ground, hands on ground with feet on bench of picnic table, hands on ground with feet on table of picnic table. I recorded the highest amount that was registered on the scale when doing a smooth (not a herky-jerky) push-up. I then divided that amount by my bodyweight to determine the percentage of my bodyweight that I was required to push in the different positions. The following are the percentages: hands on table and feet on ground (62% of bodyweight), hands on bench with feet on ground (72 % of BW), hands and feet on ground (86 % of bodyweight), feet on bench with hands on ground (91 % of bodyweight) and feet on table with hands on ground (94 % of bodyweight). Your percentages will vary depending upon the height of the bench and table as well as your body type (I am a bit on the top heavy side). This just goes to show you that it is possible to effectively vary the amount of resistance utilizing your own bodyweight. You can also reduce the resistance with push-ups by utilizing your knees rather than your toes as your pivot point. Another way to increase the resistance on push-ups and pull-ups is by shifting a greater percentage of the weight to one arm.
Knife Fighter Push-UpsKnife fighter push-ups are excellent for developing supporting grip strength but will also strengthen your chest, shoulders, triceps and wrists. Cut two 12" long pegs out of 1" thick dowel rods. Grab a dowel in the middle with each hand. Place the bottom of the dowels on the surface that you will do push-ups on (table, bench or floor). Place the dowels approximately shoulder width apart. Walk your legs back into push-up position. Lower yourself slowly until your head is at hand level. At the bottom of the push-up, you will want the dowels to be in line with your ears or extended a little further away from your shoulders. If the dowels are moved back closer to your shoulders, it is much more difficult to push yourself up because your shoulders will feel jammed. You may need to adjust your foot placement to achieve this position. You will need to experiment to see which particular surface height is the correct difficulty level for you. Start by placing the dowels on the table part of a picnic table with your feet on the ground. If you can easily do more than 5 reps, try doing the push-ups with the dowels on the bench part. Continue to experiment with the various inclines/declines until you find the position where 3 to 5 reps are challenging. As you gain strength and proficiency in this exercise and 5 repetitions are no longer challenging, switch to the next harder position. You can also decrease the percentage of your bodyweight that you are using without the picnic table by dropping to your knees.

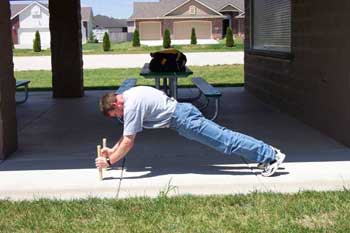 Performance Tips
- Squeeze the dowels very hard with your hands.
- Tense your abdominal muscles and glutes to protect your lower back and increase your pushing strength.
- Push the dowels down into the floor very hard with your hands to prevent them from wobbling and to work your upper body muscles harder.
Other strategies to increase the difficulty of the Knife Fighter Push-Up are:
- Place the majority of your weight on one arm
- Use PVC or metal pipe instead of a wooden dowel (more difficult because you will need to grip tighter to prevent your hands from slipping down).
- Use baseball bats rather than dowels with bats placed on the handles and hands placed where the bats taper. You will need to really grip the bats tight (especially if they are aluminum) because your hands must resist sliding down the taper. This is similar to the feel of lifting an anvil by the horn.
- Get a longer dowel and grab higher on the dowel. You will need to press the dowels very hard into the surface to keep them stable. Your muscles will need to work very hard to accomplish the push-up and keep the dowels upright.
Pinch Grip Push-UpsThis is an incredible exercise for developing your pinch grip strength. Additionally, your wrists and triceps will get a tremendous challenge as well. This is a good exercise to build up your pinch strength for rafter pull-ups. Cut a 2"x4" into two one foot long sections. As with the knife fighter push-up, the placement of the 2"x4"s and your feet can be manipulated to fit your current level of strength. Place the 2"x4"s on their ends shoulder width apart so that they extend upward one foot on whichever surface that you will do the push-ups on (table, bench, or ground). The 2" side of the board should be facing you. Pinch grip the 2"x4"s with each hand in the middle with your thumbs on the inside and fingers on the outside. Slowly lower yourself to the bottom push-up position. At the bottom, the 2"x4"s should be extended a few inches in front of your head to prevent your shoulders from feeling jammed. Once you have found the correct position, crank out some push-ups. Once you can easily do five reps, you can move to a harder variety. When you pinch grip weight plates, the challenge is preventing the weights from slipping downward out of your hands. With Pinch Grip Push-Ups, the challenge is preventing your hands from slipping down the 2"x4"s. As an alternative to placing the 2"x4"s on an elevated surface to work up to a push-up on the floor with your feet as the pivot point, you can drop to your knees. Once you can do a pinch grip push-up with your feet and 2"x4"s on the floor, difficulty can be increased by elevating your legs or by shifting the majority of your weight to one arm.
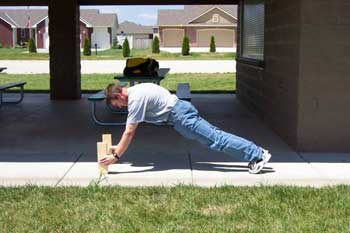
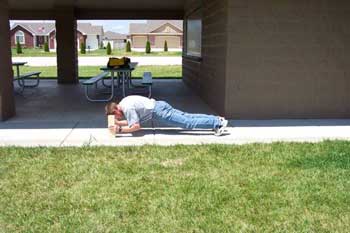 Performance Tips
- Pinch the blocks tightly with your hands
- Squeeze your abdominals and glutes
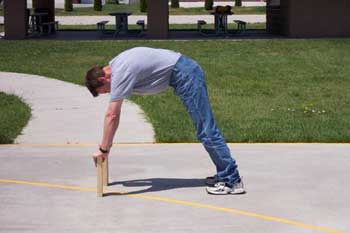
Lever JackknivesThe Lever Jackknife is an exercise that I came up with to increase my thumb and wrist strength for rafter pull-ups on a single rafter. It is also an excellent way to improve your pinch grip and abdominal strength. You may wish to avoid this exercise if you experience lower back difficulties. Utilize the same 2"x4"s that you used on the Pinch Grip Push-Ups. Place the 2"x4"s shoulder width apart on their ends on the floor so that the 12" section extends upward. The 4" side of the board should be facing you. Bend over with your feet approximately a foot and a half to two feet behind the blocks and pinch grip the top of the blocks with your thumbs on the side of the block that is closest to your body. Take a small step backward (six inches to one foot) with one foot and then the other. As you step back, allow the 2"x4"s to lever towards your body. Imagine that the blocks are an extension of your arm and allow the blocks to maintain the same angle towards the floor as that of your arms. If you can easily hold that position, take another small step backwards which will cause the 2"x4" to lever more towards you. Continue in this manner until you have found a level where it is challenging for you to hold the position for 10 seconds. Once ten seconds becomes too easy at that level, it is time to take another small step backwards. Once you have gotten to the point where you can hold the superman position (body completely extended with arms overhead) for 10 seconds, you can shift a slightly greater percentage of the weight to one hand. The challenge of this exercise is preventing the 2" x 4"s from falling to the floor towards you while holding your body in the jackknife position.
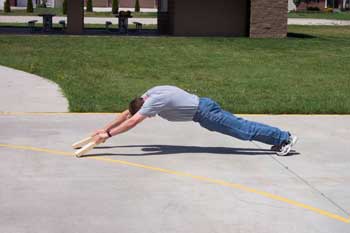
 Performance Tips
- Do not allow your wrists to bend back and press your fingers very hard into the board to take pressure off of your thumbs.
- Tighten your abs and glutes and tuck your pelvis under (do not allow your back to arch at any point of the exercise).
- When you first attempt this exercise, position your feet about shoulder width apart to give you a broad base of support. Later on, you can move your feet closer together to give your abdominals a greater challenge.
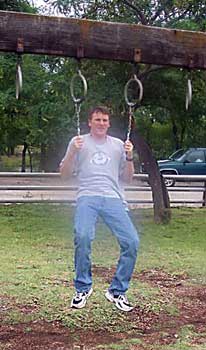
Pliers Pull-UpsJohn Brookfield taught us how to use a pair of pliers to increase our crush grip strength in Mastery of Hand Strength. As a bodyweight exercise enthusiast, I discovered a way to utilize my own bodyweight as resistance. This is a great exercise for your crush grip but will also work your lats and biceps. Utilize two chains of even lengths with a carabiner attached to one end. Loop the end of the chain with the carabiner around a bar or tree branch and attach the carabiner to a link in the middle of the chain so a few links of the chain hang down below the carabiner. Attach the other chain in the same way and make sure that the bottom links of the chain are the same height. The two chains should be about shoulder width apart. Clamp down on the lowest link of the chains with a pair of pliers in each hand. Make sure that you have a secure grip on the chain and do pull-ups. If you are not yet able to pull yourself up, just pull down as hard as you can. If the two arm pull-up is too easy for you, shift most of your weight to one arm or do a one arm pull-up for a greater challenge.
A cool thing about this exercise is that your hand position is not fixed as it is with a pull-up on a bar. During the process of the pull-up, you can adjust the position of your palms relative to your body. For example, you can start with your palms facing away from your body and then allow your palms to gradually and naturally turn towards your body while pulling yourself up. This will decrease the stress on your shoulders and elbows. The position of your palms relative to your body is determined by you rather than by the equipment that you are using.
 Performance Tips
- Tighten your abdominals and glutes and tuck your pelvis for greater pull-up power.
- Pull your shoulders down into their sockets (the opposite of a shoulder shrug) for greater shoulder safety and pull-up strength.
I realize that it would be easier and more convenient to just bring your grippers along, but this gives you another option and it is a lot of fun.
There you have it. Now you know how to
Get A Grip When You Hit The Road!
Brad Johnson is about to launch a bodyweight strength newsletter. Ask him for details on our
forum.
Back